Arranging Items
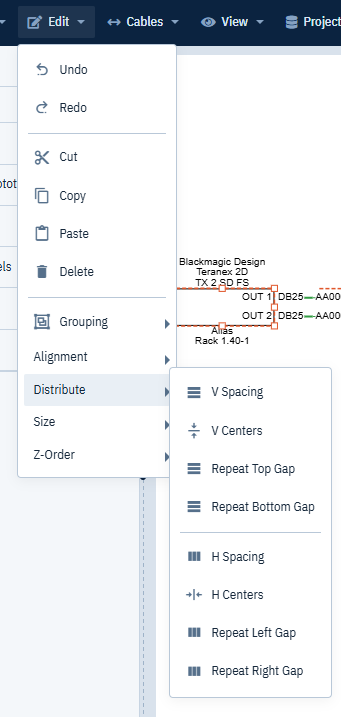
The Edit menu’s Grouping, Alignment, Distribute, Size and Z-Order submenus arrange the items on a drawing: blocks, racks and rack panels, shapes, text and pictures. Select the items first. A command that needs more items than you have selected is grayed out.
Selecting several items
Hold Shift or Ctrl and click items to add them to the selection, or drag a box around them. See Selecting and editing.
Some commands follow the item you selected first: Middle and Center line the others up on it, and Same Width and Same Height copy its size. Click that item first, then add the others.
Grouping
- Make Group joins the selection into one group you can select and move as a unit. You can still move items inside it, and the group’s outline grows or shrinks to fit.
- Make Fixed Group joins the selection so the items keep their positions relative to each other and move only as a whole.
- Make Collapsible Group adds a button to the group that collapses it to a small box and expands it again. Cables to the group’s items reroute as it collapses.
- Ungroup separates a selected group back into its items.
Right-click a group to ungroup it or change it to another kind of group. Click the group’s title to rename it.
Make Fixed Group and Make Collapsible Group aren’t available on the Free plan. See Billing and Plans.
Alignment
Select two or more items.
- Lefts, Rights, Tops and Bottoms line up the selected items with the edge of the item that is furthest in that direction. For example, Lefts moves every item so its left edge matches the left-most item.
- Middle lines up the items’ centers on a horizontal line, and Center on a vertical line, through the center of the item you selected first.
Distribute
Select three or more items.
- V Spacing and H Spacing make the gaps between the items equal, top to bottom or left to right.
- V Centers and H Centers space the items’ centers evenly instead, which suits items of different sizes.
For these four, the two outermost items stay where they are and the items between them are moved. They only even out the space that’s there: to spread items further apart, move the outermost ones first.
To use a gap you’ve set yourself instead, place two items at one end with the gap you want, then choose:
- Repeat Top Gap: the top two items set the gap, and the items below them are placed down the column.
- Repeat Bottom Gap: the bottom two items set the gap, and the items above them are placed up the column.
- Repeat Left Gap: the left two items set the gap, and the items to their right are placed along the row.
- Repeat Right Gap: the right two items set the gap, and the items to their left are placed along the row.
The two items that set the gap stay where they are, and the column or row grows or shrinks as needed.
Size
Select two or more blocks. Same Width and Same Height give them the width or height of the block you selected first. Each block keeps its top-left corner, and its ports spread out to fit. Racks and rack panels aren’t resized, because their heights follow rack units.
How blocks are measured
Middle, Center, Distribute and Size measure a block by its body, the rectangle its ports sit on, not by its labels or port stubs. Blocks whose labels differ in width still line up body to body, and so do their rows of ports. (Lefts, Rights, Tops and Bottoms use each item’s full outline, labels included.)
These commands leave cables where they are, and skip locked items (see Lock Position) and items inside a group that is also selected, which move with the group. Each command is a single step for Undo.
Z-Order
Bring Forward and Send Backward move the selected items one step in front of or behind other items that overlap them. Click again to move another step.