Signal Types
Signal types (audio, video, control and so on) belong to the project. Every port has a signal type, and every cable takes the signal type of the port it starts from. The signal type sets how the cable looks, which cable type it uses, and how it is numbered.
How signal types are used
Each signal type controls:
- Cable color, width and line type. Cables and their ports are drawn in the signal type’s stroke color. Cables use its width and line type unless you turn off By Signal Type under Stroke on the cable’s Cable tab.
- Cable manufacturer and type. Cables use the signal type’s cable manufacturer and type unless you turn off By Signal Type under Cable Type. These are what the Bill of Materials counts under Cable Types.
- Cable numbers. Cables > Number All and Number Remaining build each number from the signal type’s Cable Number Prefix and Next Cable Number, then add one to the next number.
See Drawing Cables for drawing and numbering cables, and Cable properties for the per-cable settings.
To set the signal type of a port, use View > Show/Hide Signal Types for Editing, or tick Signal types for editing on a block’s or port’s right-click menu, then click the port’s signal type and pick from the list. The list comes from this grid, and shows each type’s color, cable type and next cable number. See Functional Blocks and Ports.
Opening the Signal Types grid
Choose Project Data > Signal Types. The grid replaces the drawing, with one row per signal type, sorted by name.
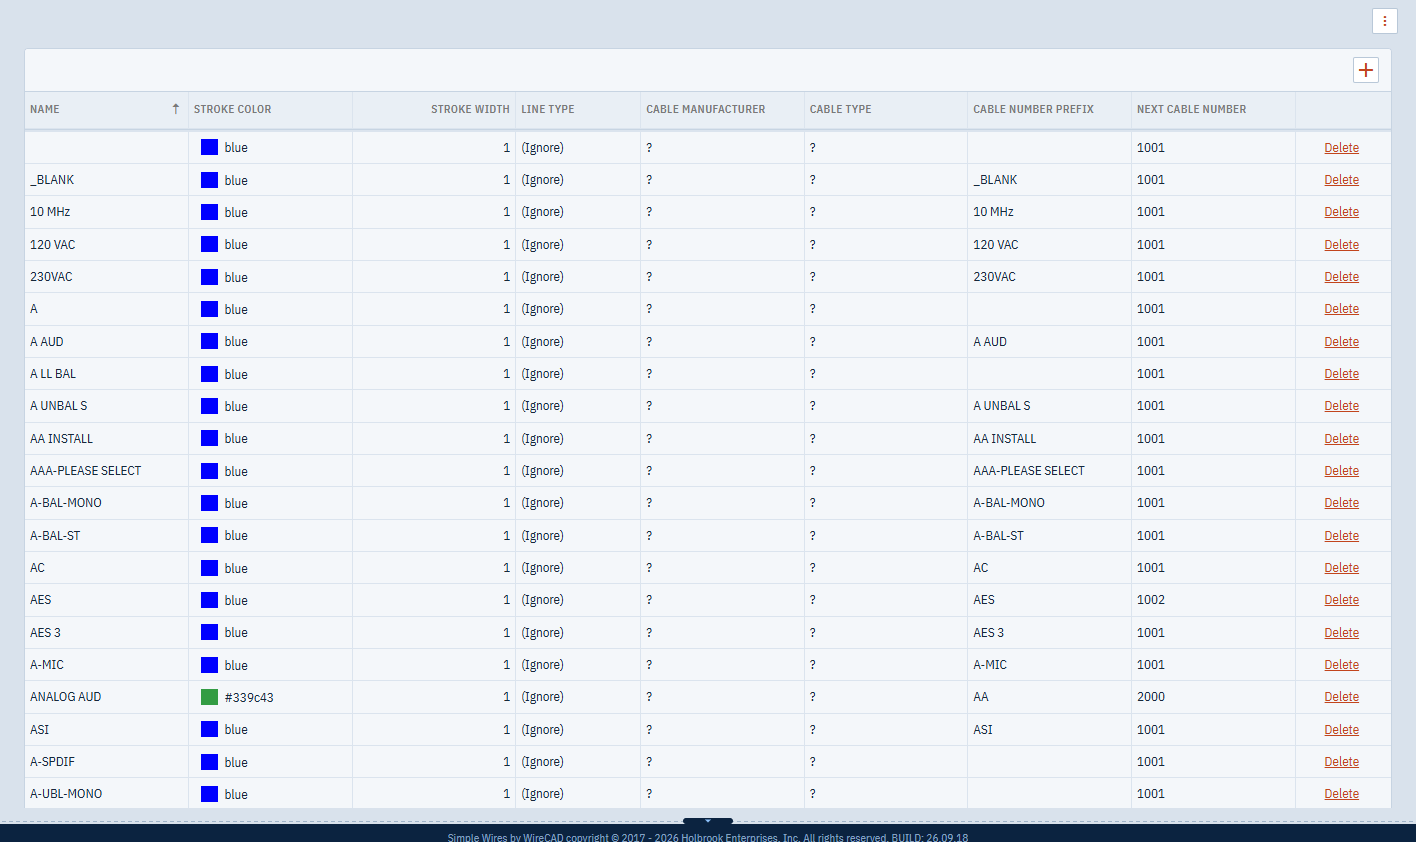
A new project starts with these signal types: Default, AC, AES, AUD, CTL, DC, DV, REF, RF, SDI and VID. They are all blue, width 1, with ? as the cable manufacturer and type, the signal type name as the prefix (none for Default) and 1001 as the next number.
If a project has no signal types at all when you open it, Simple Wires adds this default set again.
The Signal Types command isn’t available if you can only view the project.
The columns
| Column | What it does |
|---|---|
| Name | The signal type’s name, shown in the port signal type lists. |
| Stroke Color | The color of cables and ports of this type. Click the cell to pick a color. |
| Stroke Width | The line width of cables of this type. |
| Line Type | The line pattern of cables of this type, such as Solid or Dash. |
| Cable Manufacturer | The manufacturer of the cable used for this signal type. |
| Cable Type | The cable type or part number. |
| Cable Number Prefix | Text placed in front of the number, such as AUD-. Include any separator you want; Simple Wires doesn’t add one. |
| Next Cable Number | The number the next cable of this type receives. Leading zeros are kept: 0001 is followed by 0002. |
Adding a signal type
- Click Add a row (the + button above the grid). A new empty row appears.
- Click each cell and enter the values.
- Click outside the row to save it.

Editing a signal type
Click a cell, type the new value (or pick a color or line type), then press Enter or click another cell. The change is saved when you leave the cell.
Changes apply across the whole project:
- Changing Stroke Color or Stroke Width updates every port and cable of that type in every drawing, except cables where you turned off By Signal Type in the drawing that is open.
- Changing Cable Manufacturer or Cable Type updates every cable of that type that still takes its cable type from the signal type.
- Renaming a signal type renames it on every port and cable that used the old name.
- Anyone else with the project open sees a message and their drawing updates.
Deleting a signal type
Click Delete at the end of the row, then confirm.
Deleting a signal type doesn’t change any drawing. Ports and cables keep the name. If you number cables that still use a deleted signal type, Simple Wires adds it back with a red stroke, the name as the prefix and 1001 as the next number.
Replacing signal types from another project
To reuse a set of signal types you have already set up:
- Open the menu button above the grid and choose Replace with Signal Types from Another Project.
- In Select a Project, choose the project to copy from.
- Click OK.

This deletes all of this project’s signal types and replaces them with copies from the other project. It isn’t added to them.
The copied signal types include their next cable numbers.
This command isn’t available on the Free plan. See Billing and Plans.
Resetting next cable numbers
To make every signal type start numbering from the same number, for example at the start of a new phase:
- Open the menu button above the grid and choose Reset All Next Cable Numbers.
- Enter the number. It must be a number.
- Click OK.
Every signal type’s Next Cable Number is set to that value. Existing cable numbers in your drawings don’t change. To renumber a drawing afterwards, use Cables > Number All.
This command isn’t available on the Free plan.