Warehouses
A warehouse is your shelf for items you want to use again: a block you named and wired up, a rack with its panels, a page border you set up, or a whole chain of equipment with its cables. Warehouses sit in the library pane of the drawing editor, under Warehouses, and what you keep in them is available in every drawing.
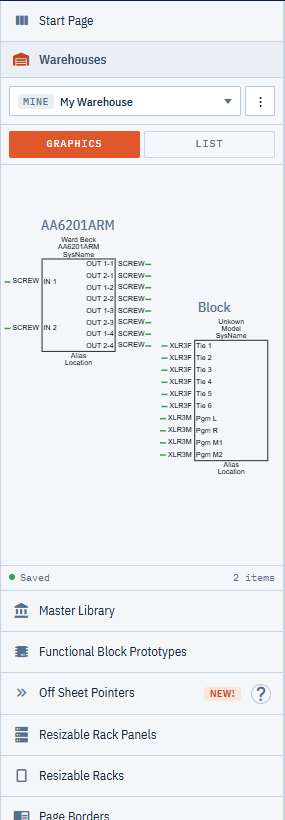
Your warehouses and your project’s
There are two kinds:
- Mine: your own warehouse. Only you see it, and it follows you into every project.
- Project: shared with everyone on the project. People who can edit the project can change it; everyone else can take items out of it but not change it.
Everyone starts with one warehouse of their own, My Warehouse, which holds whatever you had saved before.
Click the name at the top of the panel to switch warehouses. Your own are listed first, then the ones belonging to the project you have open, each with the number of items it holds.
The Free plan includes one warehouse. New warehouse is turned off once you have it, with a link to upgrade. Project warehouses other people made still show in your list. See Billing and Plans.
Put items in a warehouse
- Expand Warehouses in the library pane and choose the warehouse you want to add to.
- Select the items on the canvas.
- Drag them from the canvas and drop them in the warehouse.
A copy goes into the warehouse and the drawing keeps the originals. Cables between the items you drag come along with them.
When items land in a warehouse, their SysName, Alias and Location are reset to the placeholder text and their cable numbers are cleared, so each copy you use later starts fresh.
The warehouse saves itself a moment after you stop making changes. The status line at the bottom of the panel reads Saved, and shows what the warehouse holds.
To take items out, drag them from the warehouse onto the canvas.
To tidy a warehouse, drag items around inside it, turn the mouse wheel over it to zoom, or select an item and press Delete.
Groups
Anything you drop in one drag becomes a group, so a chain of equipment and its cables stays together. The group’s name opens for typing straight away, filled in with the next number, such as Group 4. Type over it, or press Enter to keep the number. Numbers aren’t reused after a group is deleted.
Drag a group onto a drawing and you get its parts and cables; the group itself only exists in the warehouse.
Right-click a group’s name tab for:
- Rename group (F2) and Edit description.
- Collapse or Expand, to fold a group down to its name.
- Ungroup (Ctrl+Shift+G), which keeps the parts and drops the group.
- Copy to warehouse, to put a copy in another warehouse you can change.
- Delete group, which deletes the group and everything in it, after asking.
To group items that aren’t in a group, select them and press Ctrl+G, or right-click and choose Group. Groups don’t nest.
Names
Each item in a warehouse shows a name above it: the model, or what the part is, in grey. Double-click that
name, or select the item and press F2, to call it something of your own, such as
Spare DA for truck. The name you type shows in bold.
That name belongs to the warehouse. The part’s own Model and SysName don’t change, and the name doesn’t come along when you drag the part onto a drawing. Clear it to go back to the part’s own name.
Graphics and List views
Each warehouse opens in one of two views, and remembers which one you used:
- Graphics is the canvas above: arrange items where you like, and drag them in and out.
- List is a searchable list of what’s in the warehouse, grouped by type.
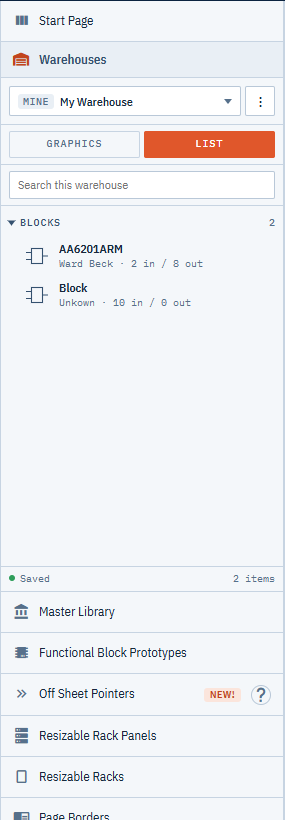
In List view:
- Type in Search this warehouse to match names, manufacturers, models and group names.
- Items are listed under Groups, Blocks, Racks, Pointers and Page borders. Click a section heading to fold it.
- Click the arrow on a group to see what’s in it.
- Drag a row onto a drawing. A group row brings the whole group with its cables; a row inside a group brings just that item.
- Right-click a row for Rename, Copy to warehouse and Delete.
Create, rename and delete warehouses
The ⋮ button beside the warehouse name holds the commands for the warehouse you have open:
- New warehouse: give it a name, an optional description, and choose Just me or Everyone on <project>. The new warehouse opens empty.
- Rename and Edit description.
- Duplicate to Mine (on a project warehouse): a copy of everything in it, in a warehouse of your own.
- Delete warehouse: asks first, and says how many items go with it. A project warehouse is deleted for everyone on the project.
Deleting your last personal warehouse leaves you with a fresh, empty My Warehouse.
Project warehouses you can only view
If you can view a project but not edit it, its warehouses show a View only banner. You can still open them, search them and drag items onto your drawings; you can’t add, rename or delete anything. Right-click an item and choose Copy to warehouse to keep a copy in your own.
See also Sharing Projects and Teams for who can edit a project.